3.1 Pixhawk 6X
Installing PX4
The desktop version of QGroundControl can be used to install PX4 firmware onto Pixhawk series flight controller boards.
Install PX4 stable
In general, you should use the most recently released version of PX4 to benefit from bug fixes and get the latest and greatest features.
To install PX4:
- Start the QGroundControl software.
- Select the "Q" icon > Vehicle Settings > Firmware (sidebar) to open the firmware settings.

- Connect the Fly Controller directly to your computer using a USB cable. Connect directly to a powered USB port on the machine (do not connect through a USB hub).
- Select the PX4 Pro Stable Release vX.xx option to install the latest stable version of PX4 for your flight controller (auto-detect).
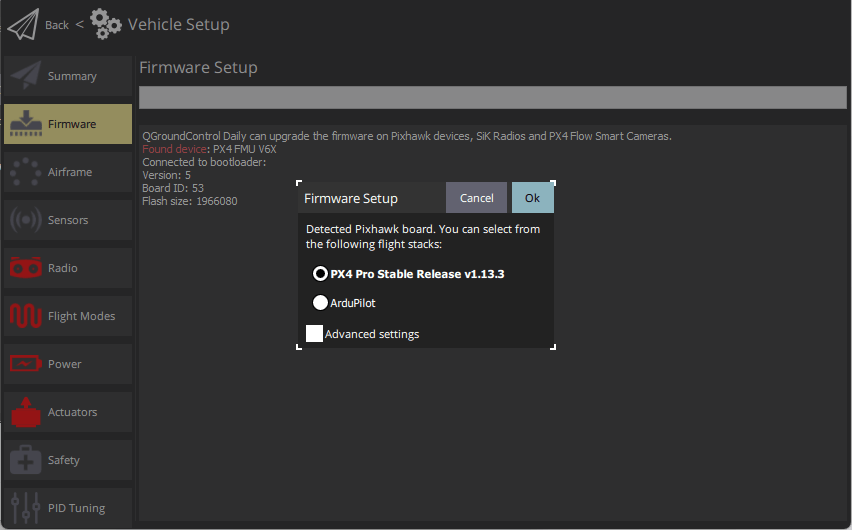
- Click the "OK" button to begin the update. The firmware will go through a series of upgrade steps (downloading new firmware, purging old firmware, etc.). Each step will be printed on the screen, and the overall progress will be displayed on a progress bar.
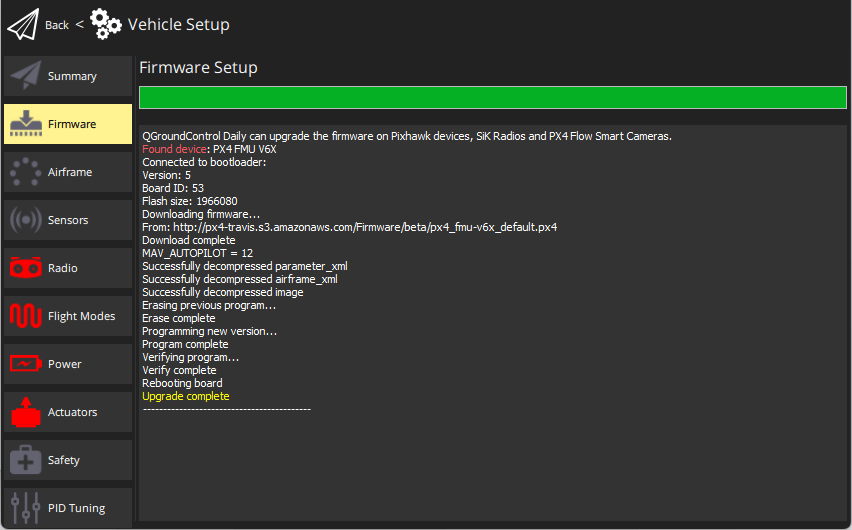 Once the firmware has finished loading, the device/vehicle will reboot and reconnect. Note: If QGroundControl installs the FMUv2 target (check the console during installation) and you have a newer motherboard, you may need to update the bootloader to access all the memory on the flight controller.
Next you need to specify the vehicle body (and then sensors, radios, etc.)
Installing PX4 main firmware, beta firmware, or custom
To install a different version of PX4:
- Connect your vehicle as described above and select PX4 Pro Stable Release vX.xx.
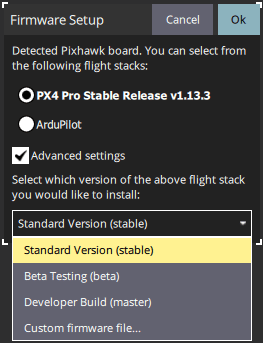
- Check Advanced Settings and select a version from the drop-down list:
- Standard (Stable): The default version (i.e. no need to use advanced setup to install!)
- Beta Testing (beta): A beta version/release candidate. Available only when a new version is ready for release.
- Developer builds (master): Latest versions of the PX4/PX4-Autopilot master branch.
- Custom firmware file...: Custom firmware file (for example, a firmware file you built locally ). If you select this option, you will need to select the custom firmware in the file system in the next step.
Firmware updates will continue as before.
Bootloader
Pixhawk hardware usually comes pre-installed with an appropriate bootloader version.
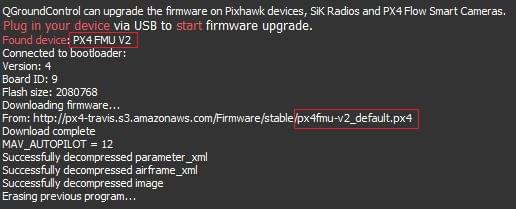
The only case where you might need to update is with a newer Pixhawk board that has the FMUv2 firmware installed. If QGroundControl installs the FMUv2 target (check the console during installation), and you have a newer board, you may need to update the bootloader to access all the memory on the flight controller.
You can update it by following the instructions in Bootloader Update > FMUv2 Bootloader Update.
Install
PX4 firmware can be built from source code on the console or on the IDE, and is suitable for both simulator and hardware targets.
Download PX4 source
The PX4 source code is stored in the PX4/PX4-Autopilot repository on Github.
git clone https://github.com/PX4/PX4-Autopilot.git --recursive
Setting up the development
Use the ubuntu.sh script to set up your development environment, allowing you to compile for the simulator or NuttX/Pixhawk toolchain. This script is designed to be run on a clean Ubuntu LTS installation and may not work if run on an existing system or a different Ubuntu version. The environment setup scripts in the source code are generally suitable for newer PX4 versions. If you are using an older version of PX4, you may need to obtain the source code specific to your version.
Run ubuntu.sh with no arguments (in a bash shell) to install everything:
bash ./PX4-Autopilot/Tools/setup/ubuntu.sh
Once completed restart your Ubuntu PC computer.
Building PX4
To build for a NuttX or Pixhawk based board, navigate to the PX4-Autopilot directory and make invoke it with the build target for your board.
For example, to build for the Pixhawk 6X hardware, you would use the following command:
cd PX4-Autopilot
make make px4_fmu-v6x_default
A successful run will end with output similar to the following:
-- Build files have been written to: /home/youruser/src/PX4-Autopilot/build/px4_fmu-v6x_default
[954/954] Creating /home/youruser/src/PX4-Autopilot/build/px4_fmu-v6x_default/px4_fmu-v6x_default.px4
The first part of the build target px4_fmu-v6x indicates the target flight controller hardware for the firmware. The suffix (in this case _default) indicates the firmware configuration, such as whether specific features are supported or omitted.
Uploading firmware to
Append upload to the make command, connect the Pixhawk flight controller to the Ubuntu PC via USB cable and use the following command to upload the compiled binary file to the autopilot hardware. For example
make px4_fmu-v6x_default upload
A successful run will end with this output:
Erase  : [====================] 100.0%
Program: [====================] 100.0%
Verify : [====================] 100.0%
Rebooting.

[100%] Built target upload
You can also list all configuration targets with the following command:
make list_config_targets
Firmware Versions and Git
PX4 firmware versions and custom firmware versions are published using the MAVLink AUTOPILOT_VERSION message and are displayed in the QGroundControl Settings > Summary panel:
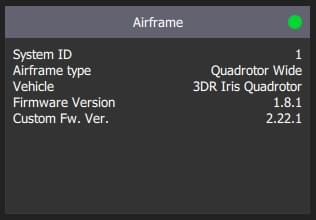
These are pulled from the active git tag of your repository tree at build time . The git tag should be of the form <PX4-version>-<vendor-version> (for example, the tags in the image above are set to v1.8.1-2.22.1).
If you use a different git tag format, version information may not display correctly.